Set up nesting boxes when your chickens are 16-17 weeks old, since most hens start laying eggs at 18-22 weeks. Some breeds take longer to reach point of lay, so you can wait until 22-23 weeks if you are raising a slower-maturing variety that does not lay until 24-28 weeks. Baby chicks and roosters never need nesting boxes, so the question only applies to your female birds. Timing the installation right matters because it gives hens a chance to learn where to lay before the first egg arrives, which means fewer floor eggs and a cleaner laying routine from day one.
When to set up nesting boxes for chickens? Generally,
Key Takeaways
- Set up nesting boxes when chickens are 16 to 17 weeks old, since most hens lay at 18 to 22 weeks.
- For slower-maturing breeds, you can wait until 22 to 23 weeks before installing boxes.
- Some breeds do not lay until 24 to 28 weeks of age.
- Only female birds need nesting boxes; baby chicks and roosters never do.
When To Set Up Nesting Boxes For Chickens?
Female chickens usually lay eggs when they become 18- 22 weeks old.
However, some breeds may take more time to lay eggs. Brahmas, Cochins, and Jersey Giants will not lay eggs until they are 24-28 weeks old.
You want to set up the nesting boxes before hens start laying eggs.
Hence, it is a solid rule of thumb to place the birdboxes in the right place after your chickens become 16-17 weeks old.
Give your flocks one or two weeks before they start laying eggs. They may visit a few times to find a comfortable, secretive, and personal space to lay eggs peacefully.
Can You Set Up Nesting Boxes Early For Chickens?
Setting up the nesting boxes too early will not be a practical choice.
Chickens may visit them repeatedly and poop inside the birdboxes. This will cause additional hassle of cleaning.
Chickens may avoid laying eggs if you don’t clean the droppings.
In addition, they may spend more time inside the nesting boxes as part of their curiosity. Some flocks may also try sleeping inside them at night.
This will affect their overall health if the nesting boxes are too dark. After all, flocks need around 14-16 hours of light daily.
Just introduce the nesting boxes 1 or 2 weeks before they are going to lay eggs.
3 or 4 weeks will be too much. This will affect their laying pattern and frequency.
What Happens If You Lately Introduce Nesting Boxes To Chickens?
Introducing nesting boxes to chickens on time is necessary. If you set up birdboxes lately, flocks may lay eggs somewhere else they find comfortable.
Generally, chickens will try to search for a fresh, secure, and cozy place before one or two days of laying eggs.
If the chicken coop is too dirty, they may start laying eggs outside the house. It will be difficult for you to spend hours and find the eggs.
Plus, predators may damage or eat them without your chicken and your knowledge.
Even laying eggs in a clean coop can be a problem. The same chicken or other chickens may break or damage them while wandering around.
When you introduce nesting boxes, chickens may not prefer to use them for laying eggs if you have already found a sweet spot.
You must train them several times to use the nesting boxes to lay eggs.
How To Set Up Nesting Boxes For Chickens?
It may appear setting up nesting boxes for chickens is a jiffy task. But it is not!
You have to consider various factors and plan properly before installing nesting boxes.
You don’t want to overlook the following steps to set up nesting boxes.
Step 01: Choosing Inside Or Outside Location
The first important thing is choosing the right location for setting up nesting boxes.
Some chicken keepers prefer to install birdboxes inside the chicken coop and some outside.
The main advantage of installing nesting boxes outside is easy egg collection. It will also save space inside the chicken coop.
However, if the outside environment is extremely cold or hot, or there are often heavy storms, you want to place the nesting boxes inside the coop.
Step 02: Selecting A Particular Spot
The next important task is selecting a particular sport for placing nesting boxes.
Make sure it is free from dirt. Also, you want to keep the bird boxes below the roosts.
But it should not be a straight bottom position. Otherwise, chicken poop will fall inside the nesting boxes.
Chickens generally need high roosts to sleep comfortably as the floor is not a clean place to get a good sleep.
Make sure the nesting boxes will face between north and east. This will prevent excessive sunlight from entering the nest boxes.
It will also be helpful against extremely windy conditions or storms. Also, there should not be any clutter in the entrance area that prevents flocks from entering the box comfortably.
Also, it should be a few inches away from the ground or floors. Otherwise, it will become dirty quickly.
Step 03: Determining How Many Boxes Hens Need
Count how many hens you have inside the chicken coop. A general rule of thumb is to add one nesting box for every three birds.
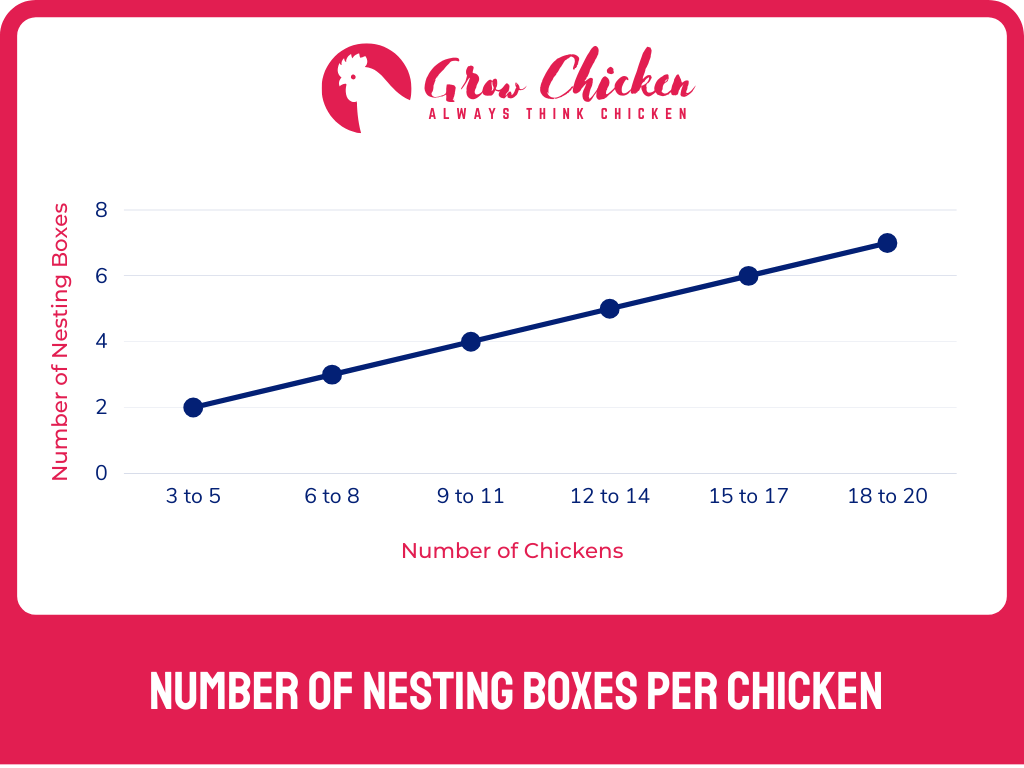
Hence, the more chickens you have, the more nesting boxes you need to set up.
It will help you prevent overcrowding and let chickens lay eggs comfortably.
Step 04: Considering The Size Of Nesting Boxes
If you want to set up nesting boxes inside the chicken coop, consider how much space your flock house has.
If it has a larger space, you can add larger birdboxes. 16-inch x 16-inch (40 cm x 40 cm) nesting boxes are a good choice.
The main advantage of larger nesting boxes is saving space. Setting up a few bigger nesting boxes is better than many smaller ones.
It will also make your cleaning job easy due to better accessibility.
However, you may need to add smaller options if the chicken coop has limited space.
Step 05: Considering The Design And Material Of Nesting Boxes
Nesting boxes are available in various designs, such as fully open, roll-away, square shape, etc.
Fully open are suitable for outside areas to let flocks easily move in and out.
Roll-away design is effective for automatically collecting eggs. You don’t need to gather eggs every day.
You can choose birdboxes from various materials, such as wooden, plastic, or metal.
Wooden options are a more natural choice, whereas plastic-based boxes are the cheapest and easy to clean.
Metal-based nesting boxes are the best choice if you prefer a premium and durable option.
Step 06: Buying Or Making Nesting Boxes
Buying nesting boxes is more convenient if you don’t have enough time to make them of your own or are not expert enough to make them perfectly.
Commercial-based options have various designs. Some brands also take pre-orders to make them based on your customizing preference.
However, DIY nesting boxes are the best choice if you want to save money and have enough technical skills and time.
You can customize them based on your chickens’ requirements.
How To Introduce Nesting Boxes To Chickens?
If you are introducing nesting boxes to chickens for the first time, they may initially show no interest in using them.
You can place a few golf balls or any white color small fake eggs inside the nesting boxes. The hens will start thinking it is an appropriate place for laying eggs.
Another effective approach is keeping a few roosters regularly inside the chicken coop. They will lead hens around and show them places to lay their eggs.
Sometimes, the rooster will sit on the nesting box and swooshe its hinny around to act like laying eggs. He will make the female chickens understand how to lay eggs.
However, if your chickens have any health issues, they may try to avoid using any nesting boxes.
Make sure to take them to a good Poultry veterinarian to figure out their health problems and treat them soonest.
Maintenance Tips For Chicken Nesting Boxes
- Use wood shavings, straws, dried leaves, shredded paper, or sawdust as nesting materials for birdboxes.
- Change the nesting material once a week to get off dirty litter and droppings.
- Regularly cleaning the nesting boxes is a solid rule of thumb to encourage hens to lay eggs on time.
- Use natural-based products such as vinegar to disinfect all birdboxes.
- Make the nesting boxes appealing by maintaining a safer and darker environment to lay eggs comfortably.
- Block the nesting boxes off at night for a few weeks initially to let them develop roosting on the perch.
- Make sure the nesting boxes are open in the early morning as most are laying eggs during this period.
- If your chickens unnecessarily sit on the nesting box, move them out several times daily. It will prevent them from sitting on the nesting box at inappropriate times.
- Add enough artificial lights during colder months to let chickens see everything.
- If a particular hen visits a wrong nesting box, make it unpleasing to her by placing any awful objects, such as stones, rocks, pieces of hard plastic, or wood pieces.
- Make sure to collect the eggs regularly if you are not going to hatch eggs.
- If new hens fight with others, set up another nesting box and let it adjust with other chickens gradually.
Summing Up
Are you still wondering when to set up nesting boxes for chickens? Everything has perfect timing, and so do chicken nesting boxes.
You want to introduce them neither too early nor too late. Both will be bad. However, using the right nesting boxes with a practical design is necessary to provide a better user experience.
Each birdbox should be large enough to accommodate at least 2-3 chickens. Make sure to follow the maintenance tips we mentioned above.
Clean the nesting boxes regularly. Avoid using the same nesting bedding material for too long. Otherwise, flocks will stop visiting the nesting boxes if it is too dirty.