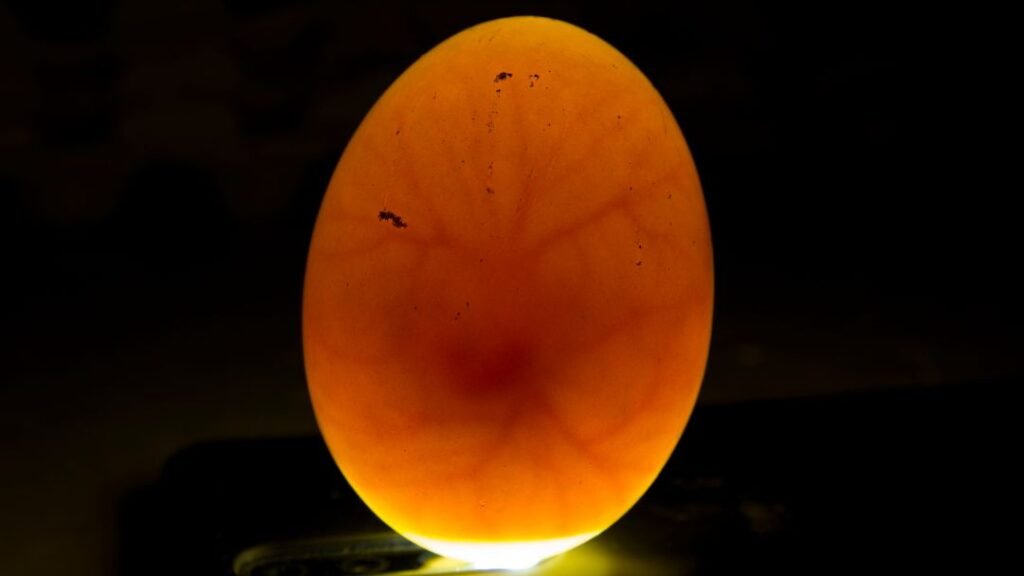
When candling chicken eggs, a bright light is shone through the egg to examine its contents. This process helps determine the egg’s fertility and embryo development.
Candling provides valuable information about the egg’s viability and helps identify any potential problems. It is an essential technique for poultry farmers and breeders, enabling them to select healthy eggs for incubation or consumption. Additionally, candling aids in detecting abnormalities such as blood spots or cracked shells.
By candling eggs, farmers can ensure the overall health and quality of the flock, improving their breeding and hatchery practices. It is a simple, yet effective method used in the poultry industry to evaluate the progress of egg incubation.
Key Takeaways
- Candling shines a bright light through an egg to examine its contents.
- It determines an egg's fertility and tracks embryo development during incubation.
- Candling helps detect abnormalities such as blood spots or cracked shells.
- It lets farmers select healthy eggs for incubation or consumption.
Understanding The Process Of Candling Chicken Eggs
Discover the fascinating process of candling chicken eggs, a technique used to examine the development of embryos. This article provides a comprehensive understanding of how candling works and its significance in poultry production.
Candling chicken eggs is an essential technique used in the poultry industry to assess the development and viability of eggs during incubation. By shining a bright light through the shell, poultry farmers can gain valuable insights into the growth of the embryo and ensure optimal conditions for hatching.
In this section, we will explore what candling is, explore its history, and understand why it is crucial for egg hatchability.
What Is Candling?
Candling is a method for examining the inside of an egg without breaking it open. By holding the egg up to a bright light source, the egg’s contents become visible, allowing the observer to observe the progression of the embryonic development.
This technique involves a relatively simple process that can provide valuable information about the egg’s fertility and overall health. Here are the key points to understand:
- Place a bright light source, such as a flashlight or a specialized candling device, below the egg.
- Hold the egg gently against the light source, ensuring that no ambient light interferes.
- Observe the interior of the egg and look for specific indicators of development.
History Of Egg Candling
The practice of candling chicken eggs dates back centuries, with its origins rooted in the ancient art of candle making. In the past, candling involved holding an egg against a candle flame to inspect its contents. Over time, advancements in technology have given rise to more refined and accurate methods, such as the use of electric lights or specialized handling equipment.
Here are some noteworthy points about the history of egg candling:
- The term “candling” refers to the historical practice of using candles to illuminate eggs.
- With the advent of electricity, modern candling techniques have evolved, leading to more precise observations.
- In the 1920s, the invention of high-intensity candlers significantly improved the accuracy of egg inspection.
Why Is Candling Important For Egg Hatchability?
Candling plays a significant role in assessing egg viability and ensuring successful hatching. By conducting regular candling sessions throughout the incubation period, poultry farmers can identify and address potential issues that may affect hatchability. Here’s why candling is crucial for maximizing egg hatchability:
- Determining egg fertility: Candling allows farmers to differentiate between fertile and infertile eggs by observing the presence or absence of embryo development.
- Monitoring embryo growth: Candling helps track the progress of embryonic development, ensuring that each egg is developing as expected.
- Identifying abnormalities and defects: By candling eggs, farmers can identify abnormalities, such as blood rings or detachment, which may indicate problems with the embryo’s health or viability.
- Removing non-viable eggs: Candling enables the removal of non-viable eggs, reducing the risk of contamination or the spread of diseases within the incubator.
By understanding the process of candling chicken eggs and leveraging its insights, poultry farmers can enhance the hatchability of their eggs and optimize the overall productivity of their flocks.
Equipment Needed For Candling Chicken Eggs
For successful candling of chicken eggs, you’ll need essential equipment like a bright light source, such as a candling lamp or flashlight, and a dark room to assess the egg’s development. A supportive egg holder or tray will also prove helpful during the process.
Candling chicken eggs is an essential part of the incubation process, allowing you to monitor the development and viability of the embryos. To successfully candle eggs, you will need specific equipment to provide optimal lighting conditions and visibility.
Below, we discuss the types of candling devices available and some DIY alternatives you can use:
Types Of Candling Devices
There are several types of candling devices you can choose from, each with its own set of benefits. Here are some popular options:
- Candling flashlight: A candling flashlight is a compact and portable option that provides a concentrated beam of light. These flashlights are specifically designed for candling eggs and often come with different attachments for better illumination.
- LED egg candler: LED egg candlers are battery-operated devices that provide bright and consistent lighting. They are typically shaped like a cylinder or disc and have a rounded cavity to hold the egg securely while you examine it.
- Candling lamps: Candling lamps are larger, tabletop devices that offer a broader and more intense light source. These lamps often come with adjustable settings for controlling the brightness, allowing you to personalize the candling experience.
- Smartphone apps: In today’s digital age, smartphone apps have also emerged as a convenient option for candling eggs. There are various apps available that utilize your phone’s flashlight to provide adequate illumination for candling. These apps often come with additional features like timers and reminders.
Diy Alternatives For Candling Eggs
If you don’t have access to specialized candling equipment or prefer a more budget-friendly option, there are a few DIY alternatives you can try:
- Regular flashlight: A regular flashlight can be used as a makeshift candling device. While it may not provide the same level of brightness and focus as specialized equipment, it can still give you a glimpse into the development of the embryos.
- Bright desk lamp: A bright desk lamp can also be utilized for candling eggs. Position the lamp in a way that the egg is illuminated from below, allowing you to observe the inside. However, be cautious not to expose the eggs to excessive heat from the lamp.
- Hole-in-a-box method: This simple DIY method involves creating a small hole on one side of a box and placing a flashlight against the hole. Insert the egg into the box from the opposite side, aligning it with the hole, and you’ll be able to see the embryo’s progress through the shell.
Remember, whichever method or device you choose, ensure that the eggs are carefully handled and protected throughout the candling process. With the right equipment or creative alternatives, you’ll be able to monitor and nurture your chicken eggs successfully.
Identifying Key Stages Of Development Through Candling
Discover the various stages of development in chicken eggs by using the technique of candling. Gain insight into the growth process without the need for costly equipment or specialized knowledge.
When it comes to incubating chicken eggs, candling is an essential practice that allows you to monitor the development of the embryos. By shining a light through the eggs, you can observe the stages of growth and determine the viability of each embryo.
Day 1-3: Formation Of Air Cell
- During the first few days of incubation, a small air cell forms at the blunt end of the egg. This air cell is essential for the growing embryo as it provides the oxygen necessary for respiration.
- By candling the eggs, you can detect the size of the air cell. A larger air cell suggests a more advanced stage of development.
Day 4-7: Blood Vessels And Embryo Development
- As incubation progresses, blood vessels start to develop, becoming visible through candling. These blood vessels act as a network to supply oxygen and nutrients to the growing embryo.
- By day 7, you can observe the embryo moving within the egg when candling. This movement indicates that the development is on track.
Day 8-10: Assessing Embryo Viability
- During the later stages of incubation, candling becomes even more critical in assessing the viability of the embryos.
- By day 8, you can distinguish between fertile and infertile eggs through candling. A clear, well-defined embryo indicates fertility, while an absence of development suggests infertility.
- Additionally, by examining the movement and position of the embryo, you can determine its viability and whether it is appropriately positioned within the egg.
Candling chicken eggs provide valuable insights into the development of the embryos at different stages of incubation. By understanding these key stages through the process, you can make informed decisions about the viability of the eggs and take necessary measures for successful hatching.
Preparing Eggs For Candling
Preparing eggs for candling is an important step in the process of checking the development of chicken eggs. By carefully examining the eggs with a bright light source, such as a candle or a specialized candling device, you can determine if the eggs are fertile or if any issues are present.
It’s an essential practice for poultry farmers to ensure healthy chick development. When it comes to candling chicken eggs, preparing them properly is essential to ensure accurate results.
Follow these guidelines to clean and sanitize the eggs and store them appropriately for the candling process:
Cleaning And Sanitizing Eggs:
- Gently wipe off any visible dirt or debris on the eggshell using a dry, soft cloth or paper towel.
- Avoid washing the eggs with water unless necessary, as it can remove the protective cuticle on the shell.
- If washing is necessary, use warm water that is slightly warmer than the eggs. Make sure to dry them thoroughly and handle them with care to avoid breakage.
- Sanitize the eggs by lightly spraying or wiping them with a commercial egg sanitizing solution. This step helps eliminate any bacteria that might be present on the shell.
- Allow the eggs to air dry completely before proceeding with the candling process.
Proper Egg Storage For Candling:
- Store the eggs in a cool and clean area with a consistent temperature between 50°F and 70°F (10°C and 21°C).
- Ensure the eggs are stored with the pointed end facing downwards. This helps to keep the yolk centered and maintains its quality.
- Use an egg carton or tray to store the eggs, ensuring they are not overcrowded. Leave enough space between the eggs to promote proper airflow.
- Avoid placing the eggs near strong odors or substances that could contaminate them, such as onions or chemicals.
- Regularly rotate the eggs by gently turning the entire carton or tray once or twice a day. This prevents the yolk from sticking to the shell and promotes even development.
- Keep the eggs away from extreme temperatures, direct sunlight, and excessive humidity, as these conditions can negatively affect egg quality.
By following these steps to clean, sanitize, and store your chicken eggs, you’ll be well-prepared for the candling process. Remember, proper preparation ensures accurate results and helps maintain the health and viability of the developing embryos.
Candling Techniques And Best Practices
Discover the essential candling techniques and best practices for examining chicken eggs. Learn how to effectively use this method to determine their fertilization and track their development.
Candling chicken eggs is an essential process during their incubation period, allowing you to observe the development and viability of the embryos inside. By shining a bright light through the shell, you can get valuable insights into the condition of the eggs.
However, to ensure accurate results, it’s crucial to follow proper candling techniques and best practices. In this section, we will discuss three key aspects: positioning eggs for candling, proper lighting conditions, and the duration and frequency of candling.
Positioning Eggs For Candling:
- Place the egg on a flat surface with the pointed end facing downward. This position helps align the air cell, allowing you to assess its size and stability.
- Hold the egg gently between your fingers or use an egg candler holder to ensure stability and minimize any unwanted movement.
- Rotate the egg slowly while candling to examine the entire surface and different sections of the shell.
Proper Lighting Conditions:
- Choose a darkened room or an area with minimal external light to enhance visibility during candling.
- Use a bright and focused light source such as a candling lamp, LED flashlight, or even a smartphone flashlight. Ensure that the light is strong enough to illuminate the inside of the egg.
- Position the light source directly above the egg, avoiding any obstructions that could cast shadows or distort the image.
Duration And Frequency Of Candling:
- It is recommended to candle chicken eggs at least once between days 7 to 10 of incubation and again on day 18.
- Keep the time of each candling session relatively short, ideally around 2-5 minutes per egg, to minimize stress on the embryos.
- During the early stages, observe the development of blood vessels and the air cells. Later, focus on detecting movement, proper positioning, and the presence of any abnormalities or signs of distress.
Candling chicken eggs requires patience and practice to develop a keen eye for identifying healthy embryos. By following these candling techniques and best practices, you can gather valuable information about the progression of your eggs’ development and make informed decisions during the incubation process.
Interpreting Candling Results
Interpreting candling results is crucial when it comes to candling chicken eggs. It helps determine the development and viability of the eggs, providing valuable insights for poultry farmers.
Identifying Fertile And Infertile Eggs:
One way to interpret candling results is to identify if an egg is fertile or infertile. Here’s how you can do it:
- Fertile eggs will show signs of development, such as the presence of a small dark spot called the blastoderm.
- Infertile eggs, on the other hand, will remain clear without any signs of development.
Identifying Early Signs Of Embryo Mortality:
Candling can also help you identify early signs of embryo mortality in chicken eggs. Look out for the following indicators:
- Blood rings: If you spot a dark ring with visible blood vessels surrounding the blastoderm, it indicates embryo mortality.
- Floating or detached embryos: An embryo that floats or appears detached from the shell is likely nonviable.
Assessing Egg Health And Viability:
Apart from determining fertility and embryo mortality, candling can help assess the overall health and viability of chicken eggs. Consider the following factors:
- Transparency: Healthy eggs should have a clear and transparent shell, allowing you to observe the contents easily.
- Air cell size: Take note of the size and stability of the air cell, as abnormalities can indicate potential issues.
- Development stages: By examining the development stages, you can gauge if the eggs are progressing normally or facing any challenges.
- Movement: Occasionally, you may notice slight movement within the egg, indicating a live embryo.
Remember, candling chicken eggs is an art that improves with practice. By interpreting the results accurately, you can make informed decisions about incubation, breeding programs, and egg quality assessment.
Common Candling Problems And Solutions
If you’re facing common candling problems while candling chicken eggs, don’t worry! We have the solutions to help you. From dark spots to unclear images, our expert tips will ensure a successful candling experience. Improve your egg candling skills today!
Dark Shelled Eggs:
Dark-shelled eggs can pose a challenge when candling, as it can be more difficult to see through the shell. Here are some common problems and solutions for candling dark-shelled eggs:
- Insufficient light penetration: Dark-shelled eggs often require more intense light to clearly see through the shell. Ensure that your candling device provides sufficient brightness to penetrate the dark shell.
- Adjusting candling time: Since dark shells can make it difficult to see the contents, you may need to extend the candling time for dark-shelled eggs. This gives you more opportunity to observe the development inside the egg.
- Direct light source: Position the light source directly behind the egg to enhance visibility. This technique helps to maximize the light passing through the dark shell, making it easier to see the embryo or any abnormalities.
Challenging Egg Positions:
Candling may become tricky when dealing with eggs that are not oriented in the typical upright position. Here are some common problems and solutions for candling challenging egg positions:
- Sideways eggs: If an egg is lying sideways, prop it up gently using a small towel or egg carton to stabilize it. This will allow for a more accurate assessment during candling.
- Tilted eggs: Eggs that are at an angle can make it difficult to view the entire contents. Slowly and carefully rotate the egg during candling to observe all areas.
- Fragile or cracked eggs: Handle fragile or cracked eggs with extreme care. Candling may be challenging due to the risk of further damaging the egg. Ensure a stable grip and proceed cautiously to minimize any harm.
Poor Lighting Conditions:
Inadequate lighting can hinder your ability to properly candle chicken eggs. Here are some common problems and solutions related to poor lighting conditions:
- Natural daylight: Candling in a dimly lit environment can make it difficult to see details. Choose a well-lit area with natural daylight or use a strong artificial light source for optimal visibility.
- Proper positioning: Ensure that the egg is positioned correctly between the light source and your eyes. This allows for the maximum amount of light to pass through the egg, making it easier to observe the developing embryo.
- Light intensity: Adjust the brightness of your candling device to suit the lighting conditions. Too much or too little light can affect your ability to see details clearly. Experiment with different lighting intensities to find the best balance.
With these solutions in mind, you can address common candling problems related to dark-shelled eggs, challenging egg positions, and poor lighting conditions. Remember, proper candling technique is essential for accurately assessing the development of chicken eggs.
Recognizing And Addressing Egg Abnormalities
Egg abnormalities in chicken eggs can often be recognized and addressed through the process of candling. By carefully examining the contents of the egg using a bright light source, potential issues such as blood rings, air cell size, and embryo development can be identified and addressed effectively for optimal hatching results.
Candling chicken eggs is an essential process to monitor the development and health of embryos. During this period, it’s important to be vigilant and address any abnormalities that arise. Here are some common egg irregularities and tips on how to handle them:
Blood Rings And Early Embryo Mortality:
- Blood rings are visible as a circle of red or brown that surrounds the embryo in the egg. This indicates early embryo mortality.
- If you notice blood rings during candling, it’s best to remove these eggs from the incubator to prevent potential contamination or the spread of infection to other eggs.
- Blood rings might be caused by genetic abnormalities, improper temperature control, or bacterial contamination.
- Dispose of the affected eggs to maintain a healthy environment for the remaining embryos.
Deformed Or Malpositioned Embryos:
- Deformed or malpositioned embryos can occur due to genetic factors, nutrient deficiencies, or improper incubation conditions.
- Look for eggs with abnormalities such as twisted beaks, crooked toes, or misshapen bodies.
- These abnormalities can sometimes be corrected by carefully repositioning the egg during incubation, but success may vary.
- Monitor the incubator temperature and humidity levels to ensure optimal conditions for embryo development.
Double Yolk And Other Abnormalities:
- Double-yolked eggs are typically a result of two yolks being released too close together and being surrounded by a single shell.
- Double-yolked eggs may have a reduced hatchability rate and are more prone to developmental issues.
- It’s advisable to remove double-yolked eggs to prevent potential complications during incubation.
- Other abnormalities such as shell defects, wrinkled shells, or watery albumen should also be addressed promptly.
- Maintaining proper incubation conditions, including temperature, humidity, and ventilation, can help minimize the occurrence of such abnormalities.
By recognizing and addressing egg abnormalities during the candling process, you can enhance the chances of a successful hatch. Regular monitoring and intervention when necessary contribute to the overall health and well-being of the developing chicken embryos.
Remember, providing optimal conditions and proactive care is vital for a strong and vibrant flock.
Conclusion
Candling chicken eggs is a fascinating process that allows you to gain valuable insights into the development of your flock. By using a bright light source to observe the inner contents of the egg, you can determine whether it is fertile or not, helping you make informed decisions on incubation or consumption.
Additionally, candling can help you identify any potential problems or abnormalities early on, allowing you to take appropriate actions to ensure the health of your chicks. Remember to handle the eggs with care during the candling process to avoid damaging them.
Whether you are a seasoned poultry farmer or just starting, mastering the art of candling can greatly enhance your understanding of the egg incubation process. So, grab your flashlight and start exploring the hidden world within your chicken eggs! It’s a truly insightful and rewarding experience for any chicken enthusiast.